Showing posts with label Tutorial. Show all posts

Wednesday, February 16, 2011

Get your Free .Com .Net .Org Domain (100% Working)

have you ever imagined to get a domain which is very popular in cyberspace?
I had never dreamed, but now that all is not that popular domain mimpi.medapatkan can be obtained by anyone without cost any payment.
how?that's the big question spread out in our mind,isn't it?
allright without any speech,... please check this out!

the first,you have to follow this link Free Premium Domain
 second, Register to Free Premium Domain but don't forget to to select your free gift
input your information.


look at your Status !
so,the last you have to offer your Referral link to complete your free gift atleast 9 referral registered.
how to offer your link?Just explore your self,okay!

if you've complete your status,Congratulation you just have a Popular domain in your arm.
that it's,i wish it can be usefull for other's.
thank's for your attention.

Tuesday, February 15, 2011

How to Make Free SMS Widget in Blog and Website


hai guys, information such as title above will not again to discuss it at length. certainly with this tool you can send sms for free via your blog. and also of course the advantage of installing this widget is to gain traffic. gain additional traffic for your blog. but there is still lack of this widget is that it can not receive a reply sms. so if there is a return we can not read it. but although such is very useful especially gedget our fatherly love sms's.

look at below for the example:


Make Widget


 Please copy the code below:


 <iframe name="I2" src="http://sms-online.web.id/widget"
width="270" height="350"> not support
</iframe><small>
<a href='http://cybercomputery.blogspot.com/2011/02/how-to-make-free-sms-widget-in-blog-and.html' rel='nofollow'>Make Widget</a></small>

* Please login to blogger
* Choose a layout
* Add a new widget
* After that you select
* Edit HTML / Javascript
* Paste the code that code you've copied

Now you can blog for free sms service for the visitors. rather, to increase traffic.

Ok buddy, that information from me, hopefully useful!

Monday, February 7, 2011

How To Hack Nokia Firmware And Install Any Unsigned Application !


a few weeks ago I bought a nokia E63 to replace my mobile phone sold.
but once I install applications and themes there are some who showed signs of error, "Certificate error" as this is the caption.
So,If you are using a Nokia Phone which has a symbian operating system then you must have tried to install an application and failed because of : Certificate error. Now your problem is going to end soon as i am going to give you a way to install any unsigned application on your symbian device. I hope you all will like it. Well, hacking Symbian devices are not very difficult task to do. I know you all must have tried to Google it before reading this post and must have found many ideas and ways to hacking your phone but the way which i am going to show you is the most easiest, permanent and the most secured way i would say.
Admin warning : Hack at your own risk. I am not liable for any loss or damage.
So, before making you much wait, I start the proceedings. I try to make it as easy as possible so that you all can understand it without any haze. I note down and explain each and every point perfectly and list down the things you will need. Note one thing that the information you provide about your phone will be secured.

Things you will need :
1. Get an account on OPDA and login to it. After redirection, Click onapply cer.
2. Fill in your all information about your phone in those appropriate fields as asked. You will be given a confirmation message after a successful submission.
3. If you submit your application for certificate successfully, you will get your certificate and key which you will need to download from logging in again.
4. Download FreeSignerand install it in your phone.
5.Download HelloOx2 and save the file in your phone. Remember : Don’t Install.
6. Now get your certificate and key from OPDA and save them in your phone.
7. Open FreeSigner and go to settings and map your certificate and key in those appropriate fields. Go back and select Add Task and map your HelloOx2 file there which you saved as referring to point number 5 above !
8. Now press option > Go and wait for a moment. Now go to the drive where you saved your HelloOx2 file.
9. You will get a new file named HelloOx2Unsigned_Signed. Now install this file and Restart your phone.
10. After a restart, run the application and wait for some time ! You will get a confirmation once the process is done !

This is It ! Now your phone is ready with a firmware hack ! You may install any unsigned application you want !

Feel free to leave a comment if any problem or confusion. I hope you liked my post ! Please leave a word of appreciation as they inspire me to write more for you

Thursday, January 20, 2011

Create a Facebook Fan Page for your Blog


Facebook is a great Social Networking Site to promote your blog or brand. Most of the major brands do have a Facebook Fan Page. Here are some examples of Facebook Fan pages – Cybercomputery FB Fan . Are you impressed and wanna create one for your blog? I too wanted to create one and i finally made it. Here is the link of my Facebook Fan Page . So lets start making our own Facebook Fan Page for our blog.
1.Go to the Create Fan Page Link on Fabebook
facebook-fan-page-for-blogger
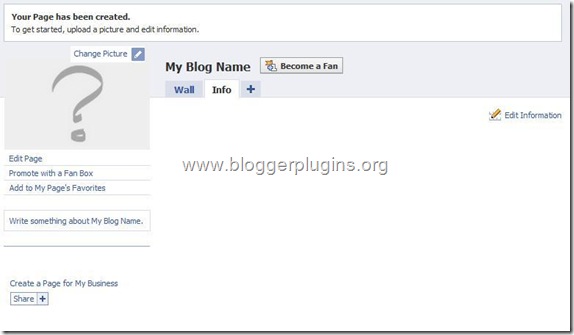
Select Brand, Product, or Organization > Website . Type the Name of your Fan Page and agree to make it public. Now just hit the Create Button and your Fan page would be created :)
2.On the Next Page, select the options Change picture and Edit Information and you what is to be done there :)
facebook-fan-page-for-blogger-2
3.Now the most important thing that you might want is to automatically import your blog posts to the Fan Page .From the Tabs, Click on the + and Opt for Notes.
add-notes-to-facebook-fan-page
On the next screen Opt to Write a New Note
write-notes-on-face-book-page
4.You will see an Editor and some icons at the Top . Click on the Notes Icon at the top.
import-notes-to-facebook-page
5.On the Next Page, opt for Import a blog
import-blog-to-facebook
6.On the next screen, type in your blog URL, and agree to the agreement and Click Start Importing
import-blog-posts-to-facebook
If this gives some error try using the url http://yourblog.blogspot.com/feeds/posts/default
7.On the Next page, Confirm the Blog import
confirm-facebook-blog-import

8.After confirming, all your blog posts will be imported to the fan page. Now click on your Fan Page Link and get back to the fan page..
click-on-face-book-fan-page-link
9.promote-with-fan-box Now we have successfully created the Fan Page.If you want to remove some of the unwanted tabs like Discussions, Photos, Boxes etc, then you can go to that Tab and remove it.
Now you can add a Fan box to your blog so that your blog readers can join you on Facebook. To do this, goto the Page Badges Link .Select Fanbox from the Left menu
Now Select your page and the Options that you want and then opt to to add the fan box to blogger using the Blogger Button

add-fan-box-to-blogger
Now you should have the Fan box added on to your blog :)
Your Fan Page URL will look something like http://www.facebook.com/pages/Blogger-Widgets/252379165362 .Now if you have a pretty good number of fans(i think the minimum requirement is 25 fans) , then you can have a pretty facebook URL like http://www.facebook.com/cybercomputery instead of a long one like http://www.facebook.com/pages/Blogger-Widgets/252379165362 .
To claim such small usernames for your facebook page, go to http://www.facebook.com/username/ and Click on Set a username for your Pages. There you can select the small pretty user name for your fan page.Once you opt for a user name you can’t change it back again. So be careful when choosing your Facebook Fan Page Username.
10. This is the most important Step of all ;)
Be my fan on Facebook ;)  and you will get all my blog updates on my Facebook Fan Page.

WordPress Security Guide: Make Your WordPress Blog Hack Proof

wordpress-security
Few days back I wrote an article telling you about , but I feel after installing fresh copy of WordPress you must work to make it hack proof. As a blogger, you must understand the most important settings to change after installing new WordPress blog importance of WordPress security and also work to make your blog secure and safe. Today, I am going to give you a WordPress security tips and guidelines. Lets start :
I’ve divided this tutorial into three sections :
   
    * Basic security techniques
    * Advance security techniques
    * WordPress security plugins
    * User suggestions

Basic Security Techniques

    Update regularly

    Update your WordPress version and plugins as soon as they get released but make sure you backup your database before clicking on update button. To upgrade WordPress automatically you can use this plugin called Automatic WordPress Upgrade

    Keep root directory clean

    Do not keep unnecessary php or html files in the root directory. Keep it as clean as possible.

    Disable directory view

    You can easily view the themes and plugins directory of any blog. It can be a security factor, so it is recommended to disable directory view. For it, open Notepad, do not write anything in it and save it as Index.php and upload it in your Themes as well as Pluginsfolder. Have a look :
    disable-directory-view

    Change default username and password

    It is not at all recommended to keep the username as admin. So you must change it, to do this you can use this plugin called Username changer. Also change the default password.
    Note : Always keep a fresh and new password for your WordPress blog that you’ve never used before. Do not keep your blog’s password same as email password.

    Research before your install plugins

    Before installing any plugin, you must read the reviews on other blogs because you blog can be hacked with bad coded plugins. So, be careful.

    Advance security techniques

    Remove WordPress Version

    There are many WordPress themes that displays the current WordPress version, if you’re using an old version of WordPress, hacker can know easily about it, so it is must to remove it. How ? I’ll tell you :
    • In the dashboard, Under Appearance Click on Editor and open header.php file
    • Now, search for the following code and remove it
    <meta name=”generator” content=”Wordpress <?php bloginfo(‘version’); ?>” />
    • Removing this code, will not display the WordPress version in the source code.

    Disable “WP-” access to search engines

    There is no need to index all your content to search engines, this can be a security issue as it becomes easy for a hacker to search for vulnerable files through advance search methods. It is recommend to limit access to search engines to those folder that starts with “wp_”.
    To disable the access, refer to this article.

    WordPress Secret Keys

    Secret keys is used to generate random salts for WordPress cookies. It is a better way to encrypt information that is stored in WordPress cookies. Follow the steps below to add secret keys to wp-config :
    • Visit this link and copy the code from there. Basically, they are randomly generated secret keys.
    • Open wp-config.php file and paste those 4 lines in it
    • Save your work and you’re done

    WordPress Security Plugins

    Login Lockdown

    With this plugin you can record the IP address of every failed WordPress login attempt. After ‘n’ number of failed attempts, this plugin will block that particular IP for 5 minutes. This helps to stop brute force attack to your blog. Click here to install.

    WP Security Scan

    We all know that the default WordPress database prefix is “wp_”. Many hackers and bad coded plugins uses this prefix to make SQL injections, so it is must to change it. You can change it by installing a simple plugin called WP Security Scan

    User Suggestions : Make sure the theme developer works on future updates
    Robin gave a comment that, recently one of his blog got hacked due to the vulnerability spotted in his theme. He used a free version theme, developed by ThemeJunkie. So, make sure the theme or plugin developer works on it to bring future updates in order to get maximum security.

    Networking Tutorial

    The CTDP Networking Guide Version 0.6.3


    Introduction

    This networking tutorial is primarily about TCP/IP network protocols and ethernet network architectures, but also briefly describes other protocol suites, network architectures, and other significant areas of networking. This networking tutorial is written for all audiences, even those with little or no networking experience. It explains in simple terms the way networks are put together, and how data packages are sent between networks and subnets along with how data is routed to the internet. This networking tutorial is broken into five main areas which are:
    1. Basics - Explains the protocols and how they work together
    2. Media - Describes the cabling and various media used to send data between multiple points of a network.
    3. Architecture - Describes some popular network architectures. A network architecture refers to the physical layout (topology) of a network along with the physical transmission media (Type of wire, wireless, etc) and the data access method (OSI Layer 2). Includes ethernet, Token Ring, ARCnet, AppleTalk, and FDDI. This main area of the networking tutorial can and should be skipped by those learning networking and read later.
    4. Other Transport Protocols - Describes IPX/SPX, NetBEUI, and more.
    5. Functions - Explains some of the functionality of networking such as routing, firewalls and DNS.
    6. Further Details - Gives information about some protocols not covered in the "Basics" section. In the future, it will include more information about packet fragmentation and re-assembly along with more details about UDP and especially TCP and TCP connections.
    7. More Complex functions - Documents multicasting, dynamic routing, and network management
    8. Applications - Documents how some of the applications work such as ping and traceroute. In the future, it will cover telnet, Rlogin, and FTP.
    9. Other Concerns - Includes installing drivers, network operating systems, applications, wide area networks, backing up the network and troubleshooting the network.
    10. References - Includes a reference list of terms, RFCs and recommended reading.
    The reader may read this networking tutorial in any order, but for beginners, it would be best to read through from the beginning with the exception of sections 2 (media), 3 (architecture), and 4 (other). At some point, however, the reader should be able to break from the basics and read about routing and IP masquerading. There are no links to various reading material or software packages inside this networking tutorial, except under the references section. This is because it is more structured, and makes it easier to keep the networking tutorial current.
    This networking tutorial will first talk about the network basics so the reader can get a good grasp of networking concepts. This should help the reader understand how each network protocol is used to perform networking. The reader will be able to understand why each protocol is needed, how it is used, and what other protocols it relies upon. This networking tutorial explains the data encapsulation techniques in preparation for transport along with some of the network protocols such as IP, TCP, UDP, ICMP, and IGMP. It explains how ARP and RARP support networking. In functional areas, such as routers, several examples are given so the user can get a grasp on how networking is done in their particular situation. This networking tutorial covers routing, IP masquerading, and firewalls and gives some explanation of how they work, how they are set up, and how and why they are used. Firewalls and the available packages are described, but how to set them up is left to other documentation specific to the operating system and the package. Application protocols such as FTP and Telnet are also briefly described. Networking terms are also explained and defined.
    This networking tutorial explains the setup of networking functions using Linux Redhat version 6.1 as an operating system (OS) platform. This will apply to server functions such as routing and IP masquerading. For more documentation on setting up packages, read documentation on this web site and other locations specific to the operating system and the package. If you know how to set up other operating servers such as Windows NT, you can apply the information in this networking tutorial to help you understand how to configure services on that OS platform.
    This networking tutorial was written because I perceived a need for a basic networking document to explain how these networking services work and how to set them up, with examples. It will help a novice to learn networking more quickly by explaining the big picture concerning how the system works together. I have seen much good networking documentation, but little that explains the theory along with practical setup and applications.

    Basic Computer Tutorial

    This basic computer tutorial is written for those who do not know very much about computers. The purpose of this basic computer tutorial is to help the reader better understand how to use their computer more effectively and safely. It will help the reader understand:
    • What files and file types are.
    • How to copy files.
    • Where your files are stored.
    • What the parts of your computer are.
    • What an operating system is.
    • What a computer program is.

    Security and Performance

    With the above basic information, this tutorial will explain methods that you can do to make your system more secure, keep your data safe by backing it up, and avoid most performance degredation caused to bad applications and SPAM.
    • How some file types can be used by third parties to gain control of your computer.
    • How to modify your file view settings so you are not as easily fooled by e-mails containing viruses.
    • How to prevent viruses and worms.
    • How to reduce SPAM.
    • How to back up your files.
    • How to reduce or eliminate unwanted programs that could reduce your system performance.
    • What to do if you receive a virus or worm.
    • What to do if you receive an e-mail telling you that an e-mail you sent contained a virus.
    This basic computer tutorial gives some basic information about hardware, operating systems, and programs in the first half to help the reader understand later information about files, e-mail and computer security practices. Depending on the reader's level of knowledge, some of the basic information may be skipped and the reader may refer to the terms page if they do not understand some of the terms.

    Twitter Delicious Facebook Digg Stumbleupon Favorites More