Friday, January 21, 2011

Better YouTube Support in Blogger

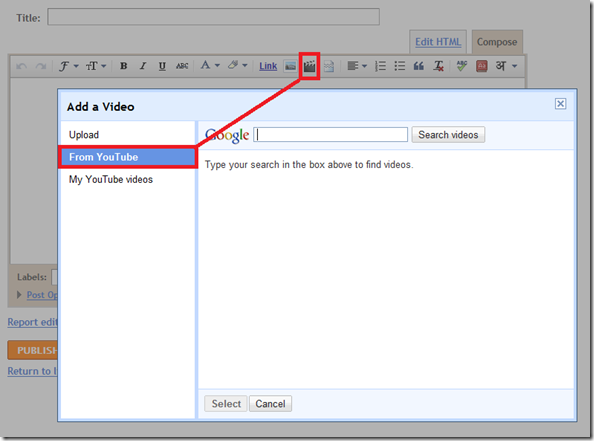
Blogger allows you to upload your own videos via the Blogger Post Editor. It also allows you to embed YouTube videos into your posts(by copy pasting the YouTube embed code into your post editor). Now Blogger has made this process even more simpler by providing a better interface for adding YouTube videos.
This YouTube integration is available only in the Updated Post Editor. So if you are still using the old editor, it’s a good time for an upgrade.

This feature is currently available in the draft version of blogger. So, to test this new feature,you should login to your Draft Dashboard (http://draft.blogger.com) instead of the regular one(http://www.blogger.com)
image
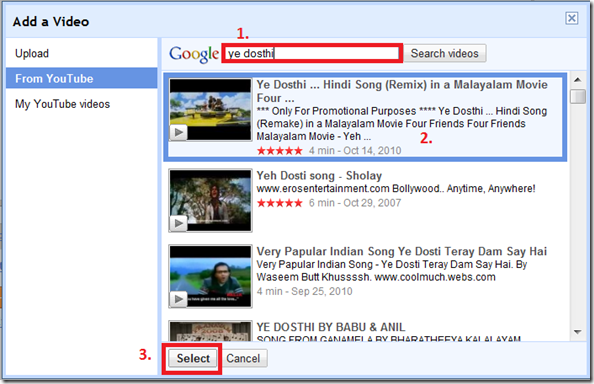
Search for some video using some keywords, select the video and click the select button
image
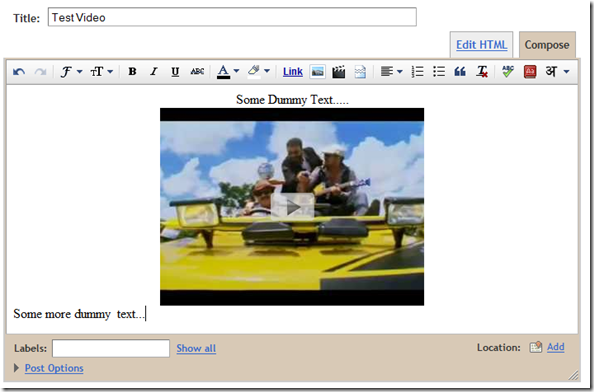
Now you should see the video in your post Editor. You can continue editing the post using the WYSIWYG Editor and publish it. If you are trying to embed your own YouTube videos(The ones uploaded to YouTube by you), then you can use the “My YouTube videos” Tab.
image

Sharing a  video from YouTube.

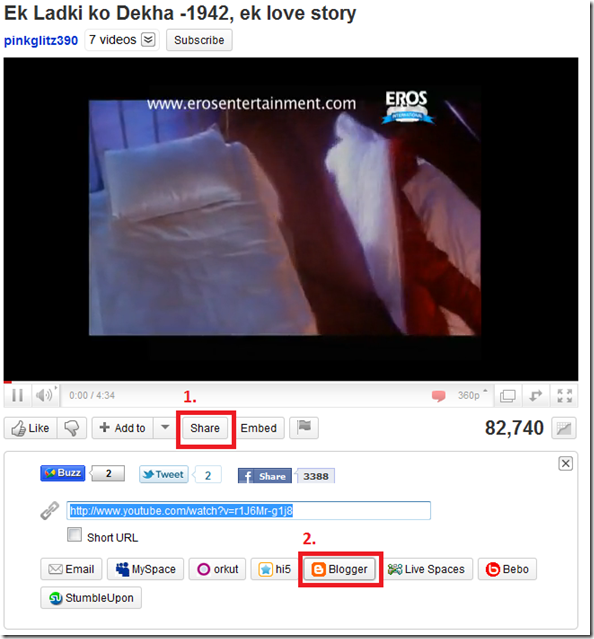
YouTube has  got a Blogger Share Button which will enable you to quickly post the video onto your blog.This might be very useful when you suddenly stumble upon some interesting video and want to post it onto your blog.
image
If you have multiple blogs, select the appropriate one from the Popup Post Editor and you can quickly publish the video to your blog.
image

Thursday, January 20, 2011

Create a Facebook Fan Page for your Blog


Facebook is a great Social Networking Site to promote your blog or brand. Most of the major brands do have a Facebook Fan Page. Here are some examples of Facebook Fan pages – Cybercomputery FB Fan . Are you impressed and wanna create one for your blog? I too wanted to create one and i finally made it. Here is the link of my Facebook Fan Page . So lets start making our own Facebook Fan Page for our blog.
1.Go to the Create Fan Page Link on Fabebook
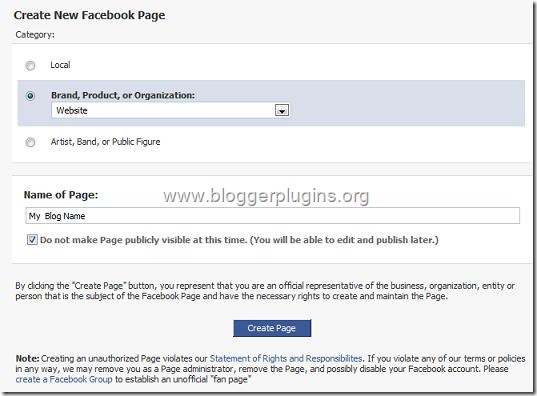
facebook-fan-page-for-blogger
Select Brand, Product, or Organization > Website . Type the Name of your Fan Page and agree to make it public. Now just hit the Create Button and your Fan page would be created :)
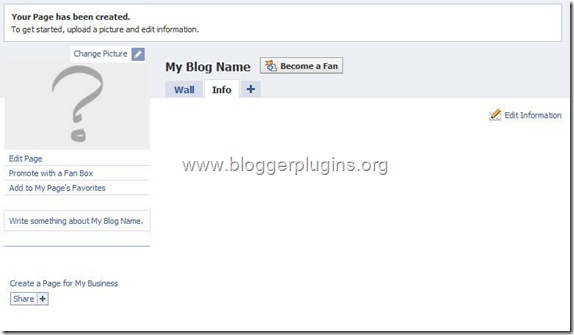
2.On the Next Page, select the options Change picture and Edit Information and you what is to be done there :)
facebook-fan-page-for-blogger-2
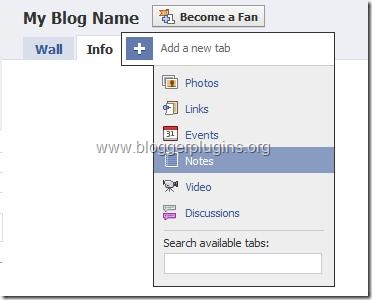
3.Now the most important thing that you might want is to automatically import your blog posts to the Fan Page .From the Tabs, Click on the + and Opt for Notes.
add-notes-to-facebook-fan-page
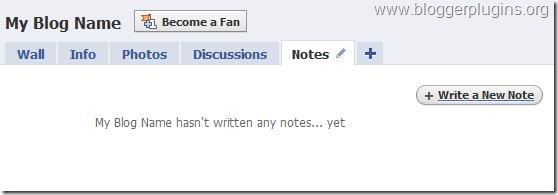
On the next screen Opt to Write a New Note
write-notes-on-face-book-page
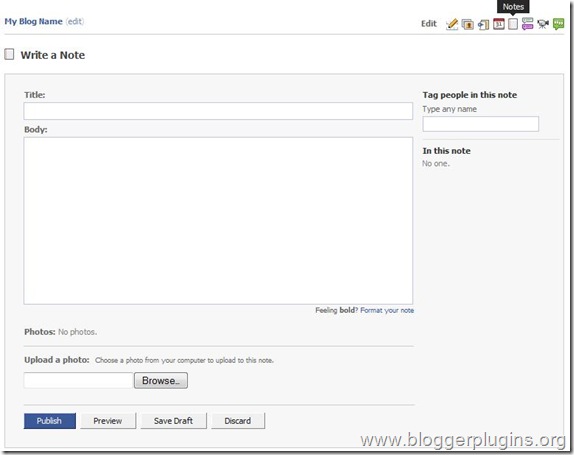
4.You will see an Editor and some icons at the Top . Click on the Notes Icon at the top.
import-notes-to-facebook-page
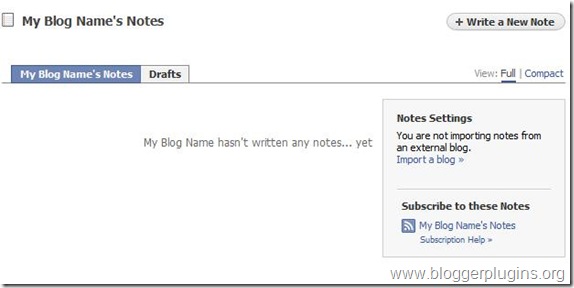
5.On the Next Page, opt for Import a blog
import-blog-to-facebook
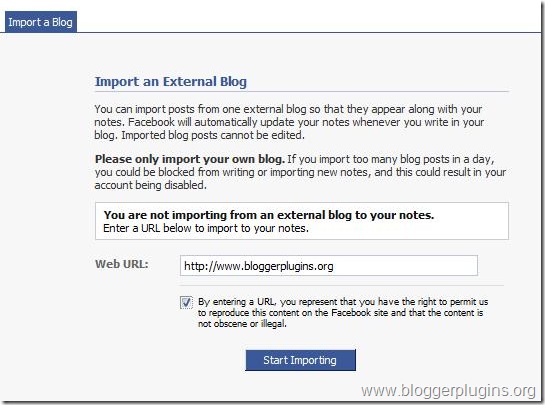
6.On the next screen, type in your blog URL, and agree to the agreement and Click Start Importing
import-blog-posts-to-facebook
If this gives some error try using the url http://yourblog.blogspot.com/feeds/posts/default
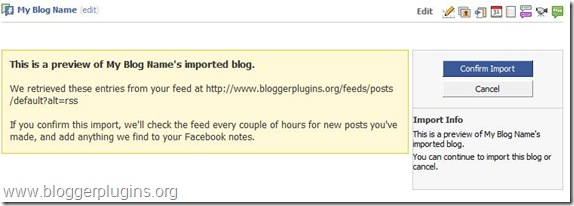
7.On the Next page, Confirm the Blog import
confirm-facebook-blog-import

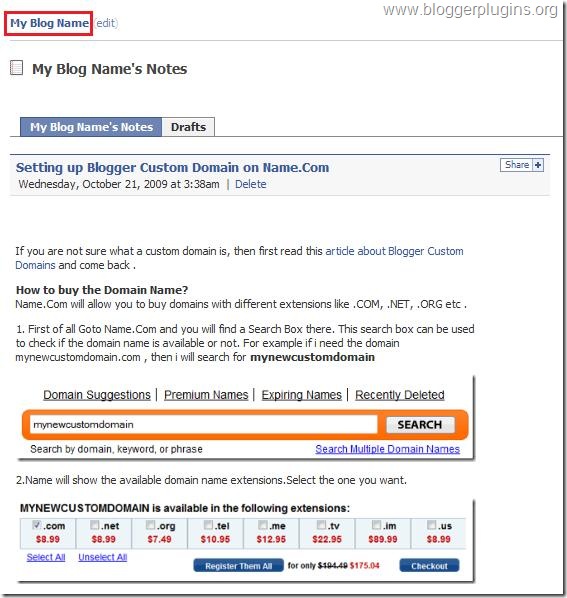
8.After confirming, all your blog posts will be imported to the fan page. Now click on your Fan Page Link and get back to the fan page..
click-on-face-book-fan-page-link
9.promote-with-fan-box Now we have successfully created the Fan Page.If you want to remove some of the unwanted tabs like Discussions, Photos, Boxes etc, then you can go to that Tab and remove it.
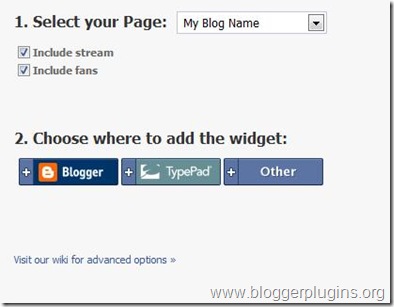
Now you can add a Fan box to your blog so that your blog readers can join you on Facebook. To do this, goto the Page Badges Link .Select Fanbox from the Left menu
Now Select your page and the Options that you want and then opt to to add the fan box to blogger using the Blogger Button

add-fan-box-to-blogger
Now you should have the Fan box added on to your blog :)
Your Fan Page URL will look something like http://www.facebook.com/pages/Blogger-Widgets/252379165362 .Now if you have a pretty good number of fans(i think the minimum requirement is 25 fans) , then you can have a pretty facebook URL like http://www.facebook.com/cybercomputery instead of a long one like http://www.facebook.com/pages/Blogger-Widgets/252379165362 .
To claim such small usernames for your facebook page, go to http://www.facebook.com/username/ and Click on Set a username for your Pages. There you can select the small pretty user name for your fan page.Once you opt for a user name you can’t change it back again. So be careful when choosing your Facebook Fan Page Username.
10. This is the most important Step of all ;)
Be my fan on Facebook ;)  and you will get all my blog updates on my Facebook Fan Page.

Facebook Like / Recommend Button For Blogger


Facebook has come up with  a new set of Social plugins which enable you to provide engaging social experiences to your users with just a line of HTML. The Facebook Like Button is One of them. You can see a demo of the like button  on this page. The Facebook like button will allow your readers to quickly share your posts with their Facebook Friends. You can also get to know how many people liked your Blog Post . 
How to Add the Facebook Like Button Below every Post
1. First Generate the Facebook code using the options below. (Code will be updated with these details)

Top of Form
Button Type                 
Text on the Like Button
Color Scheme              
Font                             
Float                            
Location                       
Display                         
Bottom of Form
Top of Form
Bottom of Form


<b:if cond='data:blog.pageType == &quot;item&quot;'>
 <div><iframe allowTransparency='true' 
expr:src='&quot;http://www.facebook.com/plugins/like.php?href=&quot;
+ data:post.url + &quot;&amp;layout=button_count&amp;
show_faces=false&amp;width=100&amp;
action=like&amp;font=arial&amp;
colorscheme=light&quot;' frameborder='0' scrolling='no' 
style='border:none; overflow:hidden; width:450px; height:40px;'/>
</div>
</b:if>

2. Copy the Above code. Login to your Blogger Account and go to Design > Edit HTML and click on the check box which says “Expand Widget Templates”
3. Look for <data:post.body/> and immediately after that place the copied code.
4. Save the template and you should see the Like Button near each of your posts. You are done :)
Do you feel that the Like Button is boring and not so likable? – Then checkout the Facebook Like box, a styled version of the Like Button which would definitely bring you more “Likes”
Upgrading the Old Like Button to the Newer Design?
If you are trying to upgrade your Facebook Like button to the newer design, then Go to Design > Edit HTML and Expand your Widget Templates. Look for layout=standard in the Facebook iframe code. and change it to layout=button_count , save the template and you are done :)

WordPress Security Guide: Make Your WordPress Blog Hack Proof

wordpress-security
Few days back I wrote an article telling you about , but I feel after installing fresh copy of WordPress you must work to make it hack proof. As a blogger, you must understand the most important settings to change after installing new WordPress blog importance of WordPress security and also work to make your blog secure and safe. Today, I am going to give you a WordPress security tips and guidelines. Lets start :
I’ve divided this tutorial into three sections :
   
    * Basic security techniques
    * Advance security techniques
    * WordPress security plugins
    * User suggestions

Basic Security Techniques

    Update regularly

    Update your WordPress version and plugins as soon as they get released but make sure you backup your database before clicking on update button. To upgrade WordPress automatically you can use this plugin called Automatic WordPress Upgrade

    Keep root directory clean

    Do not keep unnecessary php or html files in the root directory. Keep it as clean as possible.

    Disable directory view

    You can easily view the themes and plugins directory of any blog. It can be a security factor, so it is recommended to disable directory view. For it, open Notepad, do not write anything in it and save it as Index.php and upload it in your Themes as well as Pluginsfolder. Have a look :
    disable-directory-view

    Change default username and password

    It is not at all recommended to keep the username as admin. So you must change it, to do this you can use this plugin called Username changer. Also change the default password.
    Note : Always keep a fresh and new password for your WordPress blog that you’ve never used before. Do not keep your blog’s password same as email password.

    Research before your install plugins

    Before installing any plugin, you must read the reviews on other blogs because you blog can be hacked with bad coded plugins. So, be careful.

    Advance security techniques

    Remove WordPress Version

    There are many WordPress themes that displays the current WordPress version, if you’re using an old version of WordPress, hacker can know easily about it, so it is must to remove it. How ? I’ll tell you :
    • In the dashboard, Under Appearance Click on Editor and open header.php file
    • Now, search for the following code and remove it
    <meta name=”generator” content=”Wordpress <?php bloginfo(‘version’); ?>” />
    • Removing this code, will not display the WordPress version in the source code.

    Disable “WP-” access to search engines

    There is no need to index all your content to search engines, this can be a security issue as it becomes easy for a hacker to search for vulnerable files through advance search methods. It is recommend to limit access to search engines to those folder that starts with “wp_”.
    To disable the access, refer to this article.

    WordPress Secret Keys

    Secret keys is used to generate random salts for WordPress cookies. It is a better way to encrypt information that is stored in WordPress cookies. Follow the steps below to add secret keys to wp-config :
    • Visit this link and copy the code from there. Basically, they are randomly generated secret keys.
    • Open wp-config.php file and paste those 4 lines in it
    • Save your work and you’re done

    WordPress Security Plugins

    Login Lockdown

    With this plugin you can record the IP address of every failed WordPress login attempt. After ‘n’ number of failed attempts, this plugin will block that particular IP for 5 minutes. This helps to stop brute force attack to your blog. Click here to install.

    WP Security Scan

    We all know that the default WordPress database prefix is “wp_”. Many hackers and bad coded plugins uses this prefix to make SQL injections, so it is must to change it. You can change it by installing a simple plugin called WP Security Scan

    User Suggestions : Make sure the theme developer works on future updates
    Robin gave a comment that, recently one of his blog got hacked due to the vulnerability spotted in his theme. He used a free version theme, developed by ThemeJunkie. So, make sure the theme or plugin developer works on it to bring future updates in order to get maximum security.
    SEO friendly blogger templates


    This tips that will help you to make your blog design better. The points will be not be that elaborated but I’ll cover all the points in detail in my future articles. Lets start :
    1. Choose white colored background template
    2. Place search box at the top in navigation bar
    3. Have a good blog typography (I recommend Verdana fonts)
    4. Have an attractive logo/banner
    5. Always use different color or hyperlinks
    6. Template should be two or three column
    7. Before applying the template make sure you cross check it in different browsers
    8. You must display post author, category, tags and date before or after the post
    9. Use percent instead of pixels
    10. Use a good color scheme (you can take help from ColorCombos)
    11. Compress CSS code, use CSS Compress plugin to compress CSS code
    12. Always have three or four column footer
    13. Use paging
    14. Use small size graphics
    15. Avoid using Flash
    16. Do not add music
    17. Do not add unnecessary badges
    18. Avoid marquee tag (looks very unprofessional)
    19. Avoid blink tag (again looks very unprofessional)
    20. Avoid adding Google ads inside content (it will irritate readers)
    21. Do not overuse Bold tag
    22. Avoid Gif images (it takes a lot of time too load)
    23. Keep categories list as short as possible
    24. Have small blog-roll list
    25. Separate comments and track-backs
    26. Make your blog logo clickable

    Web Technology Background


    This section provides information about web technologies that relate to the interface between web servers and their clients. This information includes markup languages, programming interfaces and languages, and standards for document identification and display.

    Section Organization

    1. Markup Languages Section - Includes all markup languages including HTML, XML, and SGML. Documentation in this section currently includes an HTML Guide, XML Guide, and a Document Type Definition (DTD) reading reference.
    2. CGI Section- Includes four documents describing implementation of the client to server web interface. It includes information about the common gateway interface (CGI), server side includes (SSI), JavaScript, and writing perl script programs
    3. HTTP Section - Thic section currently includes an HTTP Reference which is based on RFC 2616. It has brief descriptions of the HTTP request and response headers and also lists the possible response headers such as 404 (not found).
    4. PHP - PHP is a scripting language that runs on the web server and the script code is embedded in the HTML document. It is easy to use with syntax similar to C which is why it is so popular. This section includes a PHP Introduction manual.
    5. JAVA Section - Documentation is being generated for this section. It currently contains some web links.
    6. MIME Section - This section describes Multipurpose Internet Mail Extension along with its purpose and it also includes a few MIME related web links.
    7. Graphics - Gif files used to add graphics to web pages.

    Technologies to be included in this section

    • Streaming audio and video

    World Wide Web Coordinating Groups

    There are many types of technologies which are used to support the world wide web and more are being developed all the time. There are several groups involved in the development and coordination of these technologies.
    • IAB - Internet Architecture Board. Web site: IAB. The IAB websites states that "The IAB does not aim to produce polished technical proposals on such topics. Rather, the intention is to stimulate action by the IESG or within the IETF community that will lead to proposals that meet general consensus."
    • IANA - Internet Assigned Numbers Authority. Web site: IANA. They control the assignment of internet addresses and domain names.
    • IESG - The Internet Engineering Steering Group. Web site: IESG. According to RFC 2418, the IESG "has responsibility for developing and reviewing specifications intended as Internet Standards."
    • IETF - The Internet Engineering Task Force. Web site: IETF. Their web site says "The Internet Engineering Task Force (IETF) is a large open international community of network designers, operators, vendors, and researchers concerned with the evolution of the Internet architecture and the smooth operation of the Internet."
    • InterNIC - Internet Network Information Center, the authority for allocating internet addresses. Web site: InterNIC.
    • IRTF - Internet Research Task Force. Web site: IRTF. Their web site states their mission is "To promote research of importance to the evolution of the future Internet by creating focused, long-term and small Research Groups working on topics related to Internet protocols, applications, architecture and technology."
    • ISOC - Internet Society, promotes internet policies. Web site: ISOC.
    • ISTF - Internet Societal Task Force. Web site: ISTF. Their mission is "To assure the open development, evolution and use of the Internet for the benefit of all people throughout the world".
    • W3C - World Wide Web Consortium, sets standards for the web working with the IETF.W3C
    • OASIS - Organization for the Advancement of Structured Information Standards. OASIS
    • Internet2 Internet2 An Organization that supports internet related technologies including XML, DHTML, JAVA and more.
    • IRT - Internet Related Technologies. Internet Related TechnologiesTheir website states "Internet2, led by over 180 U.S. universities working in partnership with industry and government, is developing and deploying advanced network applications and technologies, accelerating the creation of tomorrow's Internet."
    • Graphic Communications Association A trade association that provides standards for the printing and publishing industries.

    Networking Tutorial

    The CTDP Networking Guide Version 0.6.3


    Introduction

    This networking tutorial is primarily about TCP/IP network protocols and ethernet network architectures, but also briefly describes other protocol suites, network architectures, and other significant areas of networking. This networking tutorial is written for all audiences, even those with little or no networking experience. It explains in simple terms the way networks are put together, and how data packages are sent between networks and subnets along with how data is routed to the internet. This networking tutorial is broken into five main areas which are:
    1. Basics - Explains the protocols and how they work together
    2. Media - Describes the cabling and various media used to send data between multiple points of a network.
    3. Architecture - Describes some popular network architectures. A network architecture refers to the physical layout (topology) of a network along with the physical transmission media (Type of wire, wireless, etc) and the data access method (OSI Layer 2). Includes ethernet, Token Ring, ARCnet, AppleTalk, and FDDI. This main area of the networking tutorial can and should be skipped by those learning networking and read later.
    4. Other Transport Protocols - Describes IPX/SPX, NetBEUI, and more.
    5. Functions - Explains some of the functionality of networking such as routing, firewalls and DNS.
    6. Further Details - Gives information about some protocols not covered in the "Basics" section. In the future, it will include more information about packet fragmentation and re-assembly along with more details about UDP and especially TCP and TCP connections.
    7. More Complex functions - Documents multicasting, dynamic routing, and network management
    8. Applications - Documents how some of the applications work such as ping and traceroute. In the future, it will cover telnet, Rlogin, and FTP.
    9. Other Concerns - Includes installing drivers, network operating systems, applications, wide area networks, backing up the network and troubleshooting the network.
    10. References - Includes a reference list of terms, RFCs and recommended reading.
    The reader may read this networking tutorial in any order, but for beginners, it would be best to read through from the beginning with the exception of sections 2 (media), 3 (architecture), and 4 (other). At some point, however, the reader should be able to break from the basics and read about routing and IP masquerading. There are no links to various reading material or software packages inside this networking tutorial, except under the references section. This is because it is more structured, and makes it easier to keep the networking tutorial current.
    This networking tutorial will first talk about the network basics so the reader can get a good grasp of networking concepts. This should help the reader understand how each network protocol is used to perform networking. The reader will be able to understand why each protocol is needed, how it is used, and what other protocols it relies upon. This networking tutorial explains the data encapsulation techniques in preparation for transport along with some of the network protocols such as IP, TCP, UDP, ICMP, and IGMP. It explains how ARP and RARP support networking. In functional areas, such as routers, several examples are given so the user can get a grasp on how networking is done in their particular situation. This networking tutorial covers routing, IP masquerading, and firewalls and gives some explanation of how they work, how they are set up, and how and why they are used. Firewalls and the available packages are described, but how to set them up is left to other documentation specific to the operating system and the package. Application protocols such as FTP and Telnet are also briefly described. Networking terms are also explained and defined.
    This networking tutorial explains the setup of networking functions using Linux Redhat version 6.1 as an operating system (OS) platform. This will apply to server functions such as routing and IP masquerading. For more documentation on setting up packages, read documentation on this web site and other locations specific to the operating system and the package. If you know how to set up other operating servers such as Windows NT, you can apply the information in this networking tutorial to help you understand how to configure services on that OS platform.
    This networking tutorial was written because I perceived a need for a basic networking document to explain how these networking services work and how to set them up, with examples. It will help a novice to learn networking more quickly by explaining the big picture concerning how the system works together. I have seen much good networking documentation, but little that explains the theory along with practical setup and applications.

    Basic Computer Tutorial

    This basic computer tutorial is written for those who do not know very much about computers. The purpose of this basic computer tutorial is to help the reader better understand how to use their computer more effectively and safely. It will help the reader understand:
    • What files and file types are.
    • How to copy files.
    • Where your files are stored.
    • What the parts of your computer are.
    • What an operating system is.
    • What a computer program is.

    Security and Performance

    With the above basic information, this tutorial will explain methods that you can do to make your system more secure, keep your data safe by backing it up, and avoid most performance degredation caused to bad applications and SPAM.
    • How some file types can be used by third parties to gain control of your computer.
    • How to modify your file view settings so you are not as easily fooled by e-mails containing viruses.
    • How to prevent viruses and worms.
    • How to reduce SPAM.
    • How to back up your files.
    • How to reduce or eliminate unwanted programs that could reduce your system performance.
    • What to do if you receive a virus or worm.
    • What to do if you receive an e-mail telling you that an e-mail you sent contained a virus.
    This basic computer tutorial gives some basic information about hardware, operating systems, and programs in the first half to help the reader understand later information about files, e-mail and computer security practices. Depending on the reader's level of knowledge, some of the basic information may be skipped and the reader may refer to the terms page if they do not understand some of the terms.

    Twitter Delicious Facebook Digg Stumbleupon Favorites More